Overview
The Localization System provides a streamlined pipeline for handling Text and Audio localization across VRseBuilder modules. It centralizes setup, automates content collection, and simplifies the translation workflow. Made on top of Unity LocalizationPlease note, the Live Link feature will not work at the same time as localization, this is currently broken as of 0.6.1
How Localization Works
When the final app is built into an APK, users can select their preferred language from the Main Menu. Once a language is selected:- The entire app switches to that language
- All localized modules will play in the selected language
- Any module that has not been localized will fallback to the default language
Per-Scene Localization
Localization in VRseBuilder is done on a per-scene basis. Each scene (module) must be localized individually using the process below. This gives you control over which modules support which languages. The following guide walks through how to localize a single scene.1. Prepare Your Scene
Work on your scene and add all VO (Voice Over) and texts to the experience you are working on. Ensure all your content is in place before starting the localization process.Note: All TMP (TextMeshPro) components must contain some text in their fields, or they will not be collected during the scan.
2. Start Localization
When ready, open the Localization Setup tool: VRseBuilder → Localization Setup Select Start Localization. This works on a scene basis — the tool scans only the currently active scene.What Happens During Scan
The system will:- Scan your scene and collect references on everything that needs to be localized
- Gather all TMP and Text components, Story VO entries, MCQ texts, Checklist texts, and Media Action texts
- Create String Tables that need to be fed with translations
What Will NOT Get Found
- Values set by custom code that change at runtime
- Non-TextMeshPro text components
- Mesh-based text
Note: Runtime texts are now automatically identified using the RuntimeText tag — no manual configuration required.
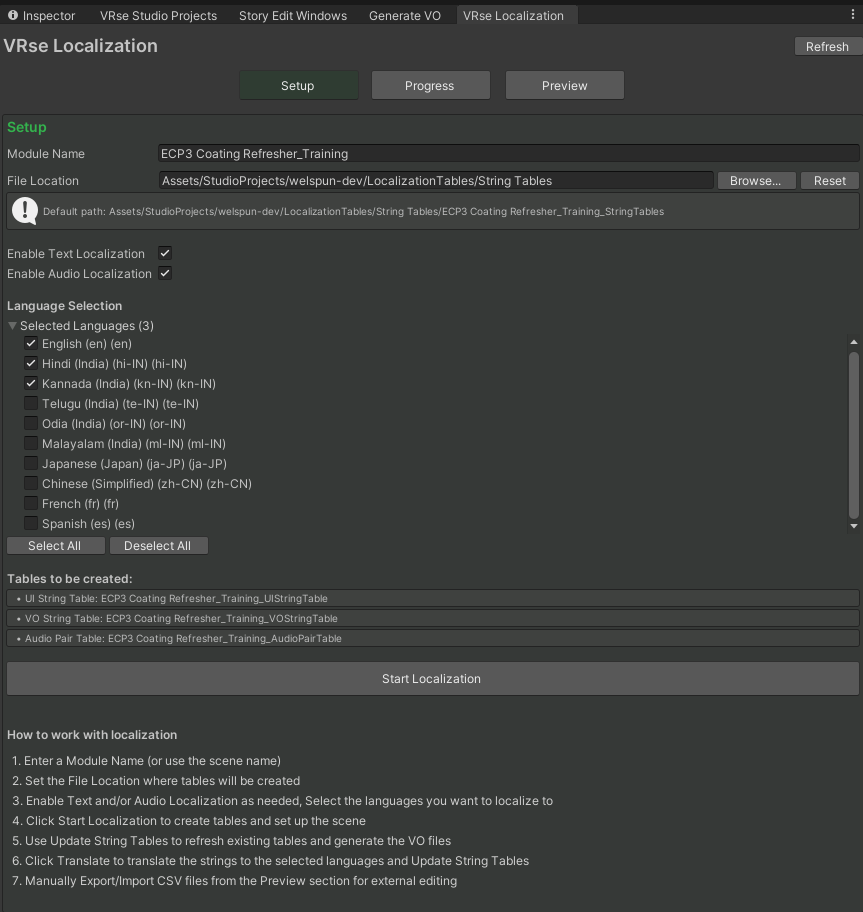
3. Add a New Language
Before translating, ensure your target language is added to the project.- Open Project Settings → Localization
- Click Add Locale
- Search and select your target language/locale
- Save the locale asset in
Assets/VRseBuilder/_Core/Runtime/Systems/Localization/Settings/Locales - Return to the VRseBuilder Localization Tool — the new language will now appear automatically in the language list
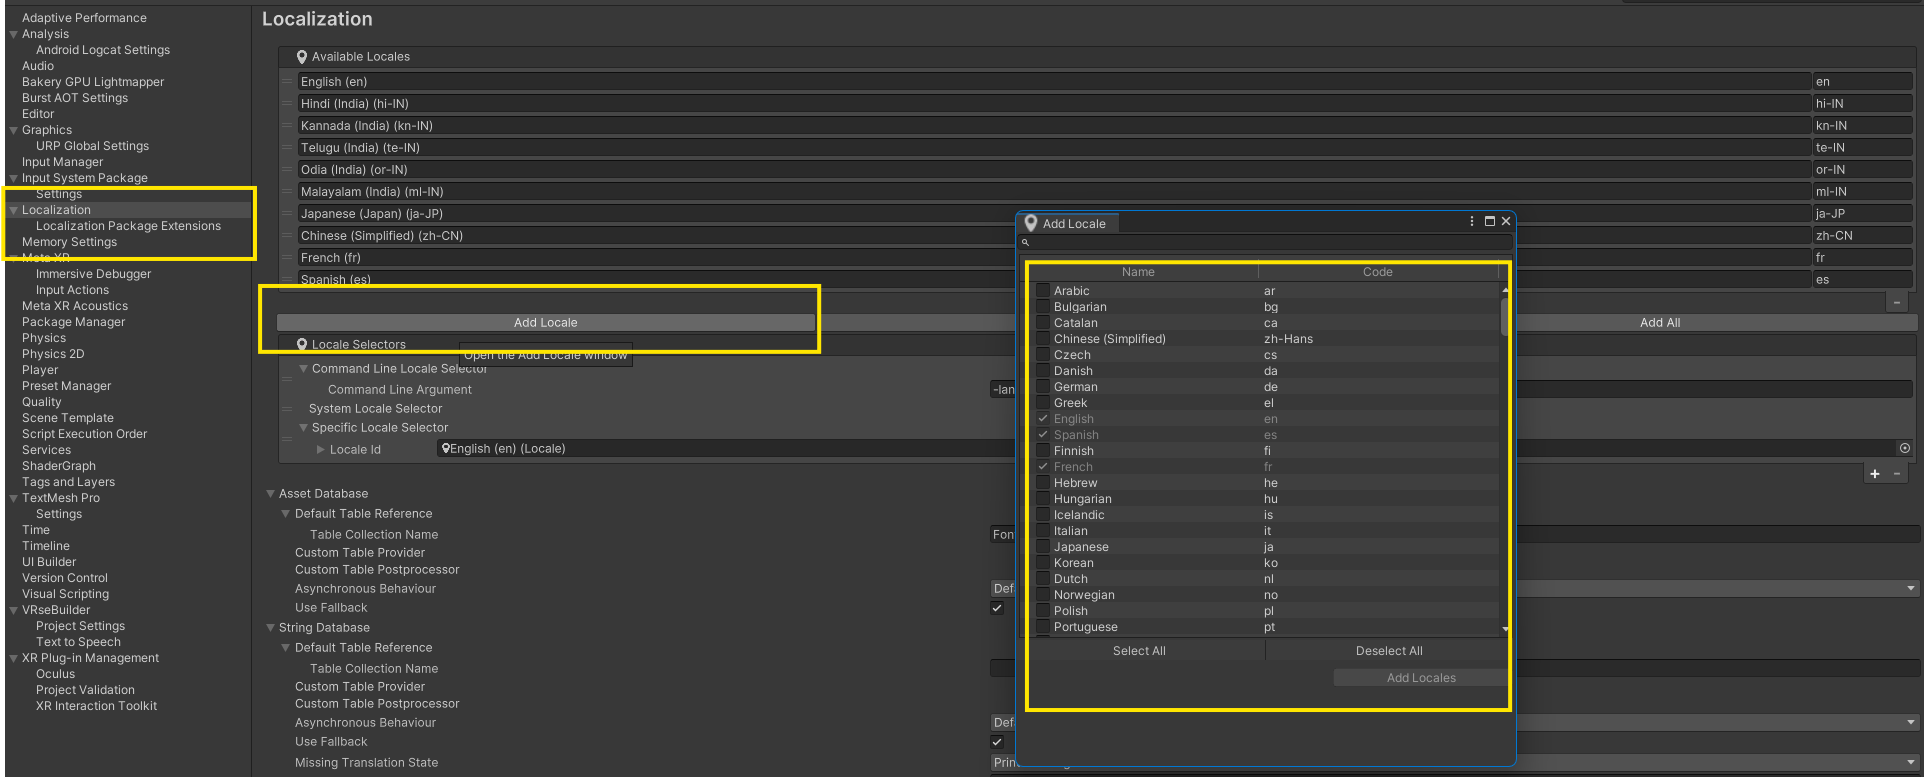
Note: You only need to do this once per language for the entire project.
4. Translate Your Content
Go to the Preview tab and hit Translate.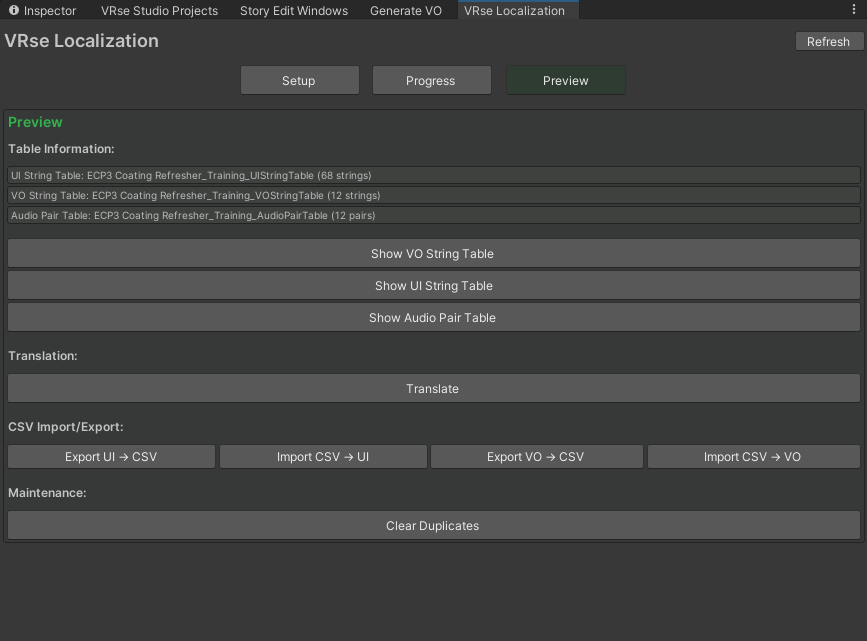
Auto-Translation
The system will automatically translate all values found during the scan and update your tables. This uses the same VO provider configured in the Generate VO tab for text-to-speech generation.Tip: You can add your own VO provider in the Generate VO settings.
Manual Editing
You can export the table as a CSV file and edit the values externally if you need more control over translations.5. Generate Voice Over
Once you are happy with the translated tables:- Go back to the Setup tab
- Select Generate VO and Update Tables
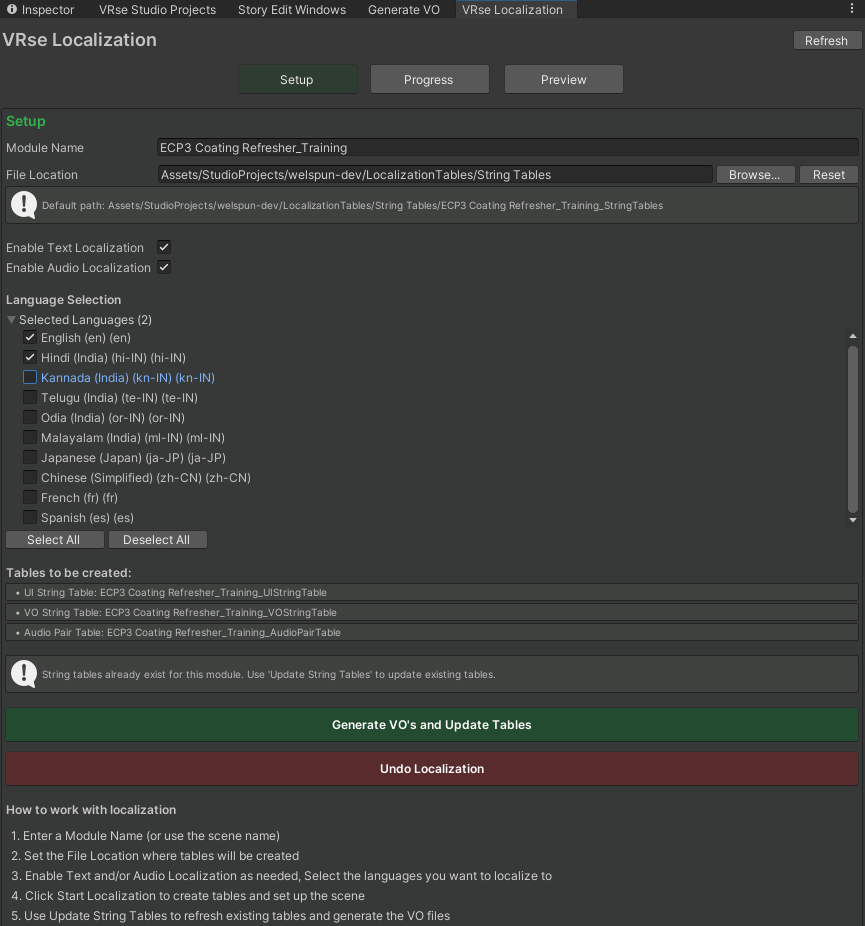
- Generate voice over sound files for each translated voice over entry
- Re-scan the scene and add any new entries to the existing tables
6. Final Setup Configuration
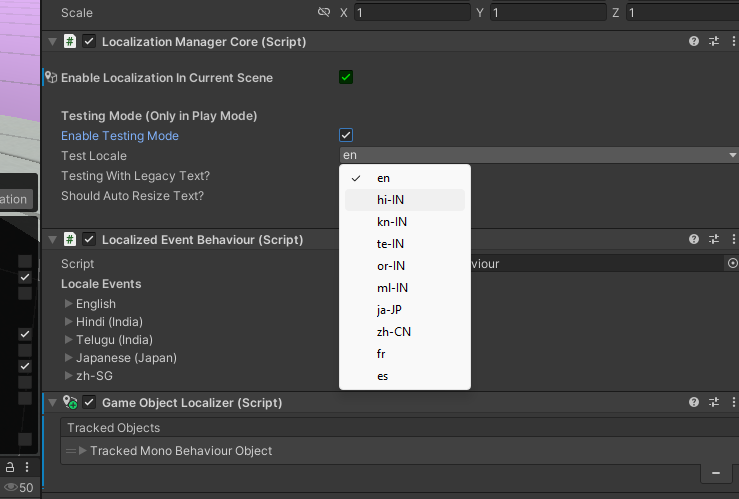
Enable Localization
On the Localization Manager GameObject in your scene, ensure the following is configured:- Enable Localization in Current Scene — This boolean must be enabled for localization features to execute

Dev Scene Configuration
The same setting must also be enabled on the Dev Scene of your project. The Dev Scene is where all the story information for one module is saved.Main Menu Localization
By default, the Main Menu remains in English. This allows users to select their preferred language at the beginning of the experience. If you want to localize your Main Menu:- You must run the entire localization setup on the Main Menu scene as well
7. Testing Your Localization
To test localization in the editor:- Find the Localization Manager GameObject in your scene
- Enable the Testing toggle
- Select your desired locale from the dropdown
8. Updating Localization
Every time you edit your story and add new text or voice over:- Return to the Localization Setup tool
- Update the tables
- Provide translations for each new value
Important: If you don’t update translations for new content, it will fallback to the default text/voice.
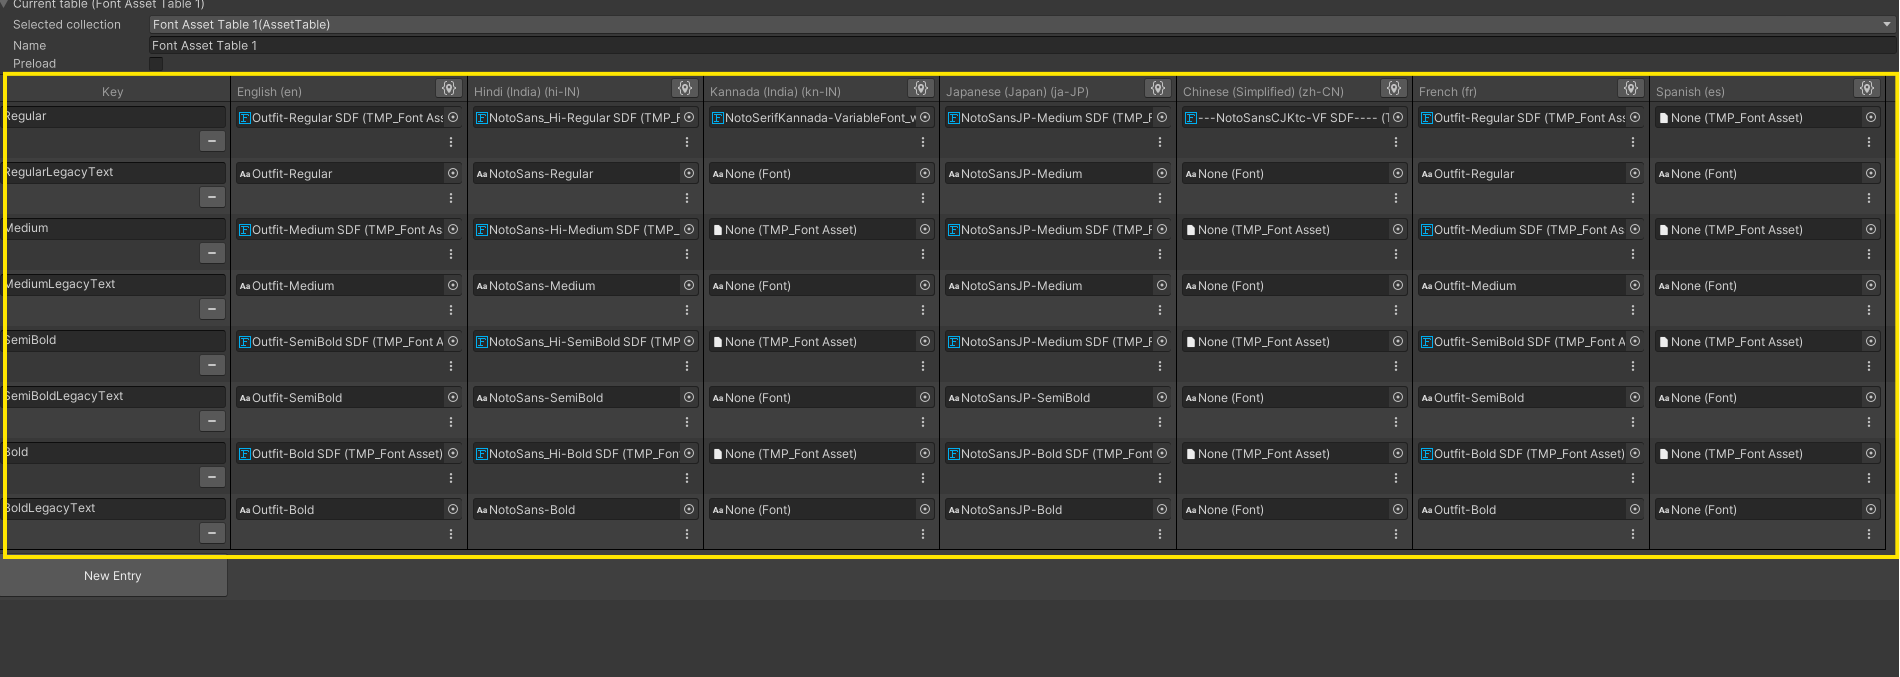
9. Indian Languages Font Handling
Unity TextMeshPro does not fully support all Indian languages in UI. Some strings will have text rendering issues. There is no universal font — each language requires a dedicated font setup.Important: If font setup is not done for an Indian language, the text will break at runtime.
Supported Languages
The following Indian languages have proper font support without shaping issues:- Hindi
- Tamil
- Marathi
Font Setup Steps
- Import a supported font for the language from Google Fonts
- Create a TMP Font Asset from the imported font
- Open the Font Asset Table and add font entries for required text sizes
- Assign the new TMP Font Asset references