> ## Documentation Index
> Fetch the complete documentation index at: https://docs-vrsebuilder.autovrse.app/llms.txt
> Use this file to discover all available pages before exploring further.
# Configure API (Deprecated)
> Connect cloud services
## Pulse
In order to collect analytics data from the application and view it centrally on a dashboard, we must configure it on Unity. Follow the steps below:
It would look something like this: **https\://\.vrse-builder.autovrse.app/api/**
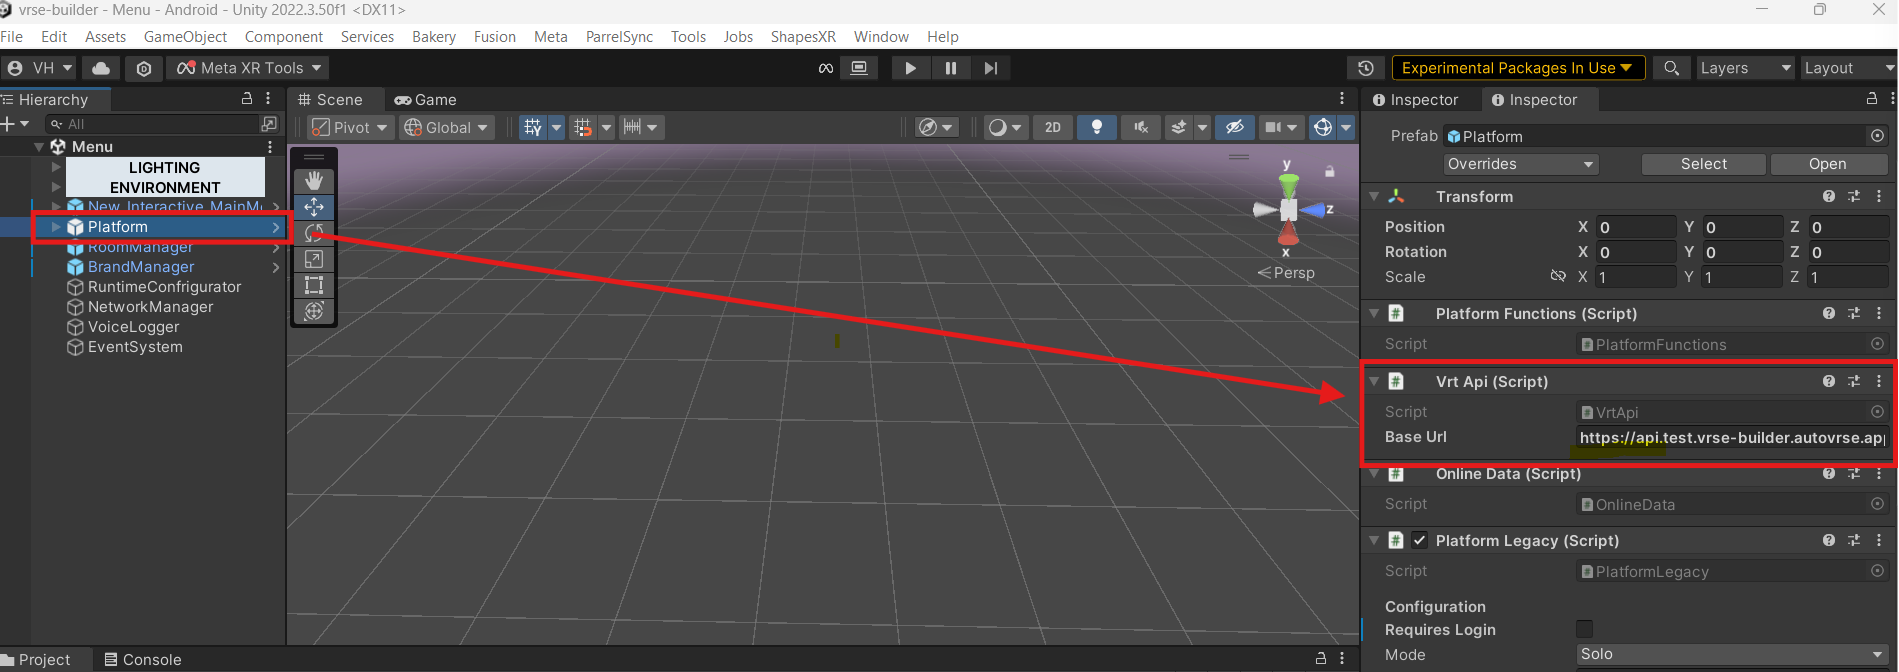
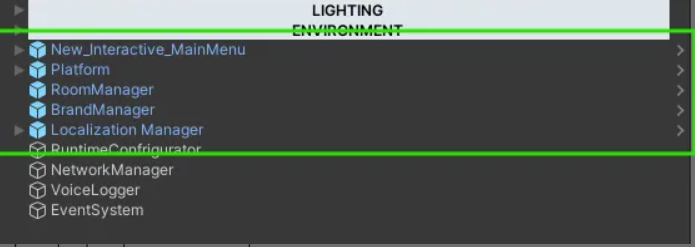
Find the **Platform** Gameobject on the Heirarchy, this should have a component called VrtApi attached to it, go ahead and paste your BaseURL from previous step there
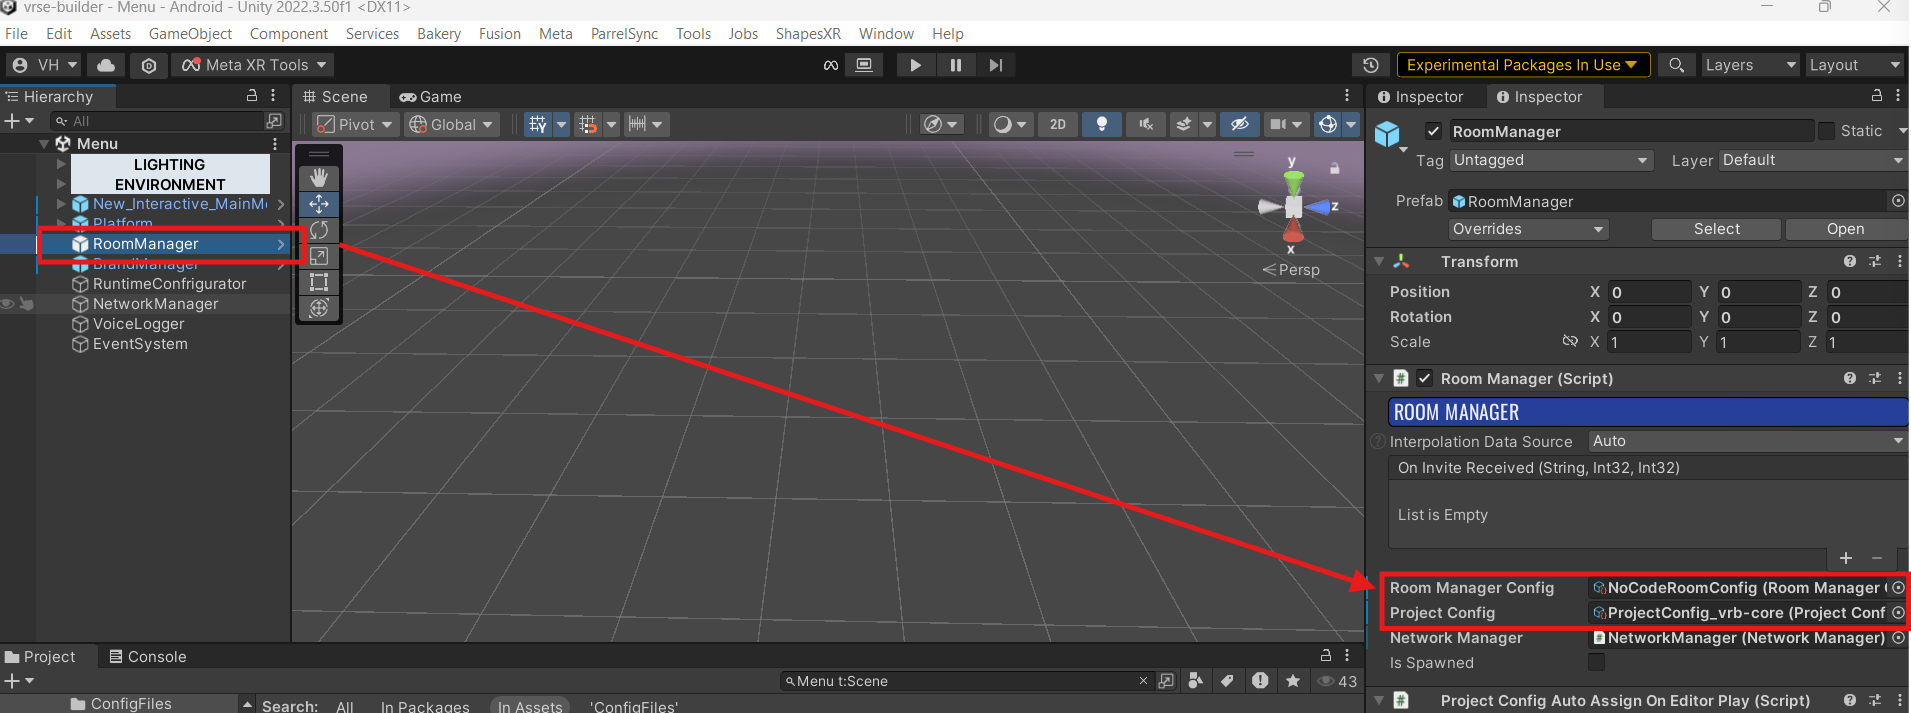
 You would have created configuration files in the [previous step](https://autovrse-749835a2.mintlify.app/unity-sdk/project-config-files#vrse-builder-configuration-files), these need to be assigned on the Menu scene as well
Find the RoomManager gameobject on the Menu scene and the RoomManager component on it, replace the reference with your Room Manager Config and Project Config here
You would have created configuration files in the [previous step](https://autovrse-749835a2.mintlify.app/unity-sdk/project-config-files#vrse-builder-configuration-files), these need to be assigned on the Menu scene as well
Find the RoomManager gameobject on the Menu scene and the RoomManager component on it, replace the reference with your Room Manager Config and Project Config here
 ### User Authentication Configuration
Now we need to decide what kind of In-VR authentication we want for our users, the current available options are
1. **Domain Name** - Each user belongs to a domain and the domain has a password, an admin can know this password and fill it up before the user, the user must simply enter an identifier such as employee-id or any other username to gain access to their account
2. **User Name\_Password** - Simple username and password based login
3. **Guest Login** - Username and password type login which also gives an option to login as guest
4. **OTP SSO -** Connect your SSO provider, generate OTP on the dashboard and login in VR
To pick a type, simply go to **Platform** Gameobject and '**PlatformNew**' component, change Login method there
### Connecting Modules
Each module sends per moment information to pulse, each module needs to be identified by it so a small setup is required
If you have a fresh/empty instance of the dashboard start from here
You must have received the link and credentials along with your deployment
Within pulse, on a fresh instance, we should first create domains and departments
Go to the organization section on the left tab and select domain
### User Authentication Configuration
Now we need to decide what kind of In-VR authentication we want for our users, the current available options are
1. **Domain Name** - Each user belongs to a domain and the domain has a password, an admin can know this password and fill it up before the user, the user must simply enter an identifier such as employee-id or any other username to gain access to their account
2. **User Name\_Password** - Simple username and password based login
3. **Guest Login** - Username and password type login which also gives an option to login as guest
4. **OTP SSO -** Connect your SSO provider, generate OTP on the dashboard and login in VR
To pick a type, simply go to **Platform** Gameobject and '**PlatformNew**' component, change Login method there
### Connecting Modules
Each module sends per moment information to pulse, each module needs to be identified by it so a small setup is required
If you have a fresh/empty instance of the dashboard start from here
You must have received the link and credentials along with your deployment
Within pulse, on a fresh instance, we should first create domains and departments
Go to the organization section on the left tab and select domain
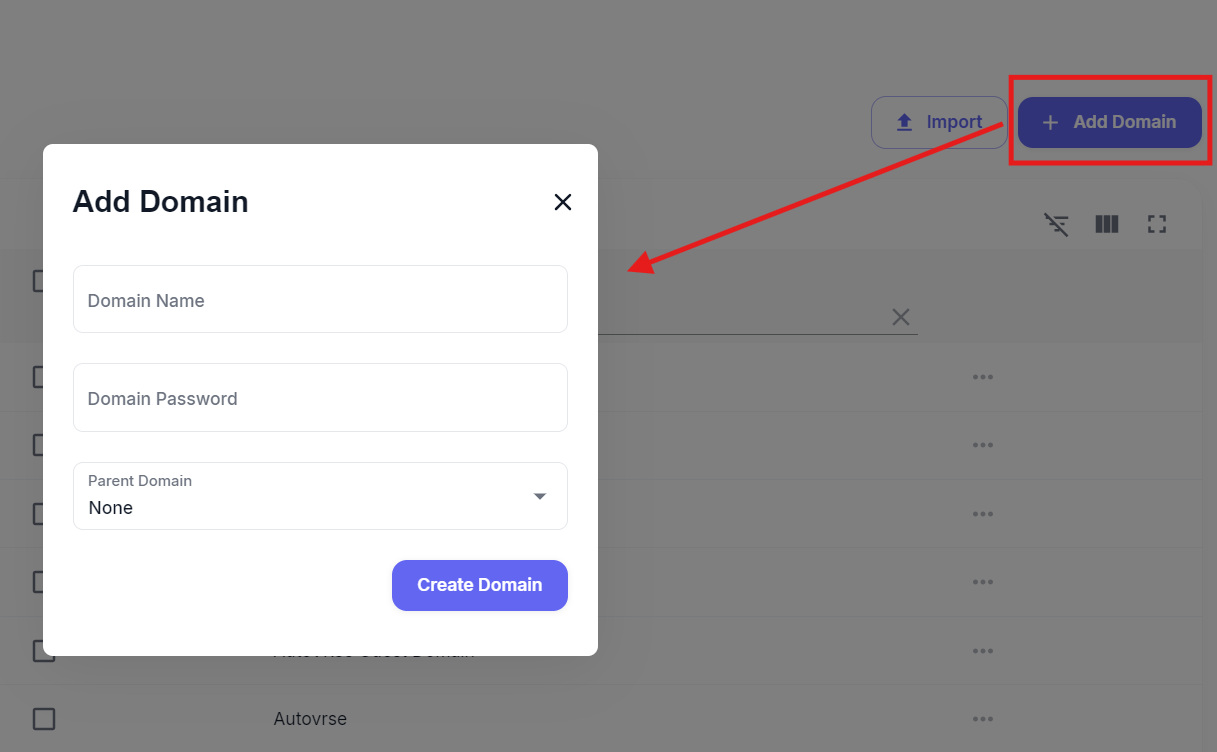 Give it a name and password, you can configure parent-child domain relation if you like
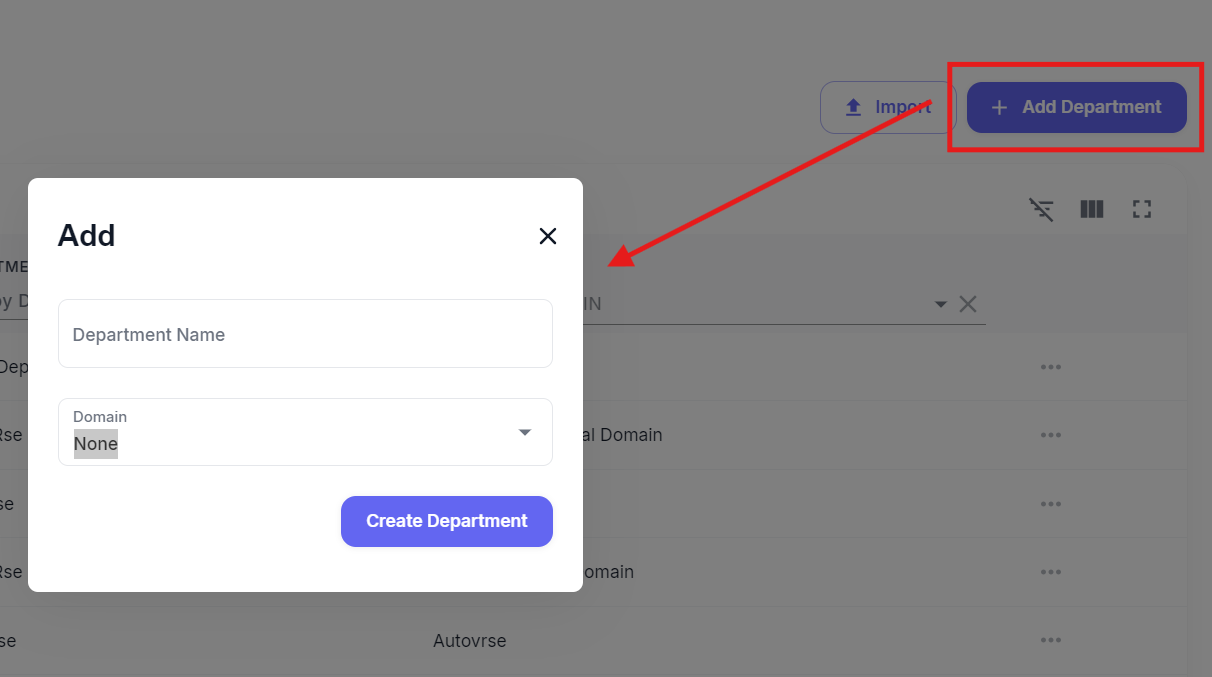
Next, we create a Department
Give it a name and password, you can configure parent-child domain relation if you like
Next, we create a Department
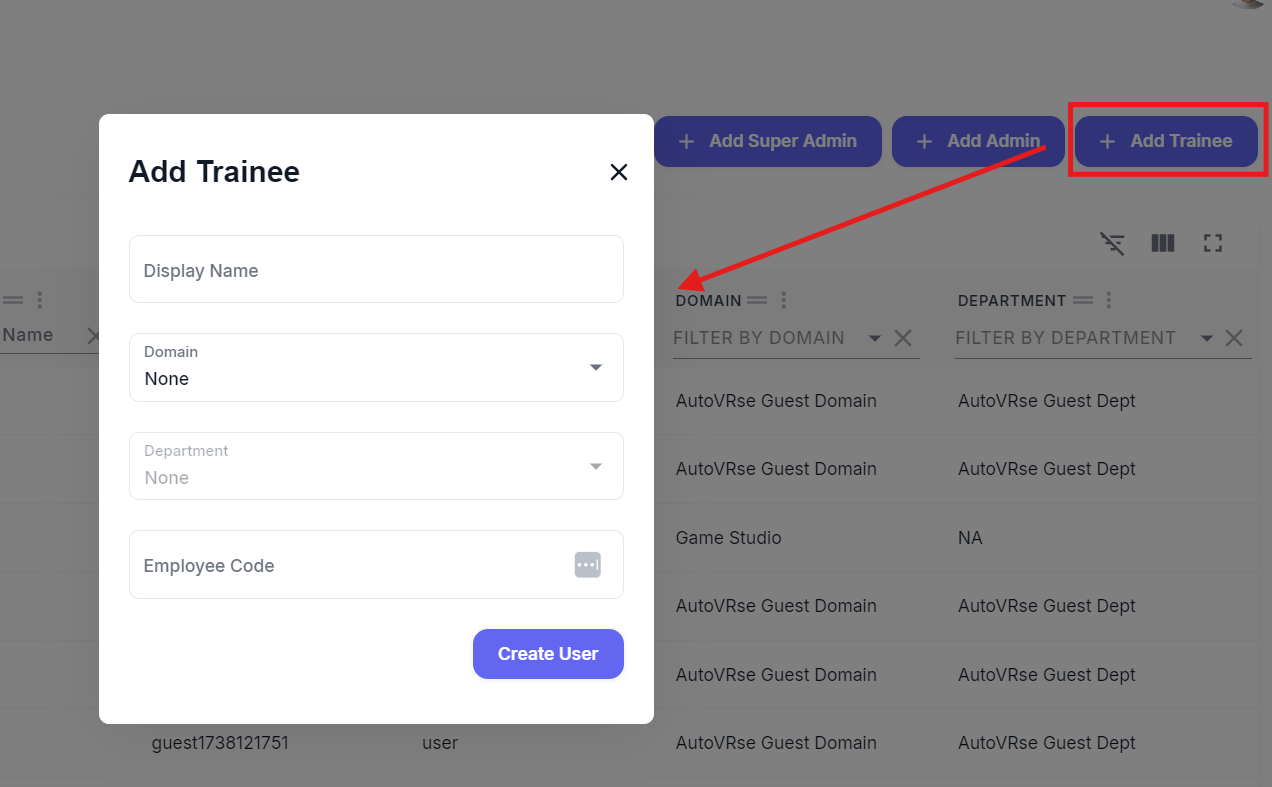
 Go to the Users tab and select "Add Trainee".
Enter display name, select the domain and domain you just created, and give the trainee an employee code
Go to the Users tab and select "Add Trainee".
Enter display name, select the domain and domain you just created, and give the trainee an employee code
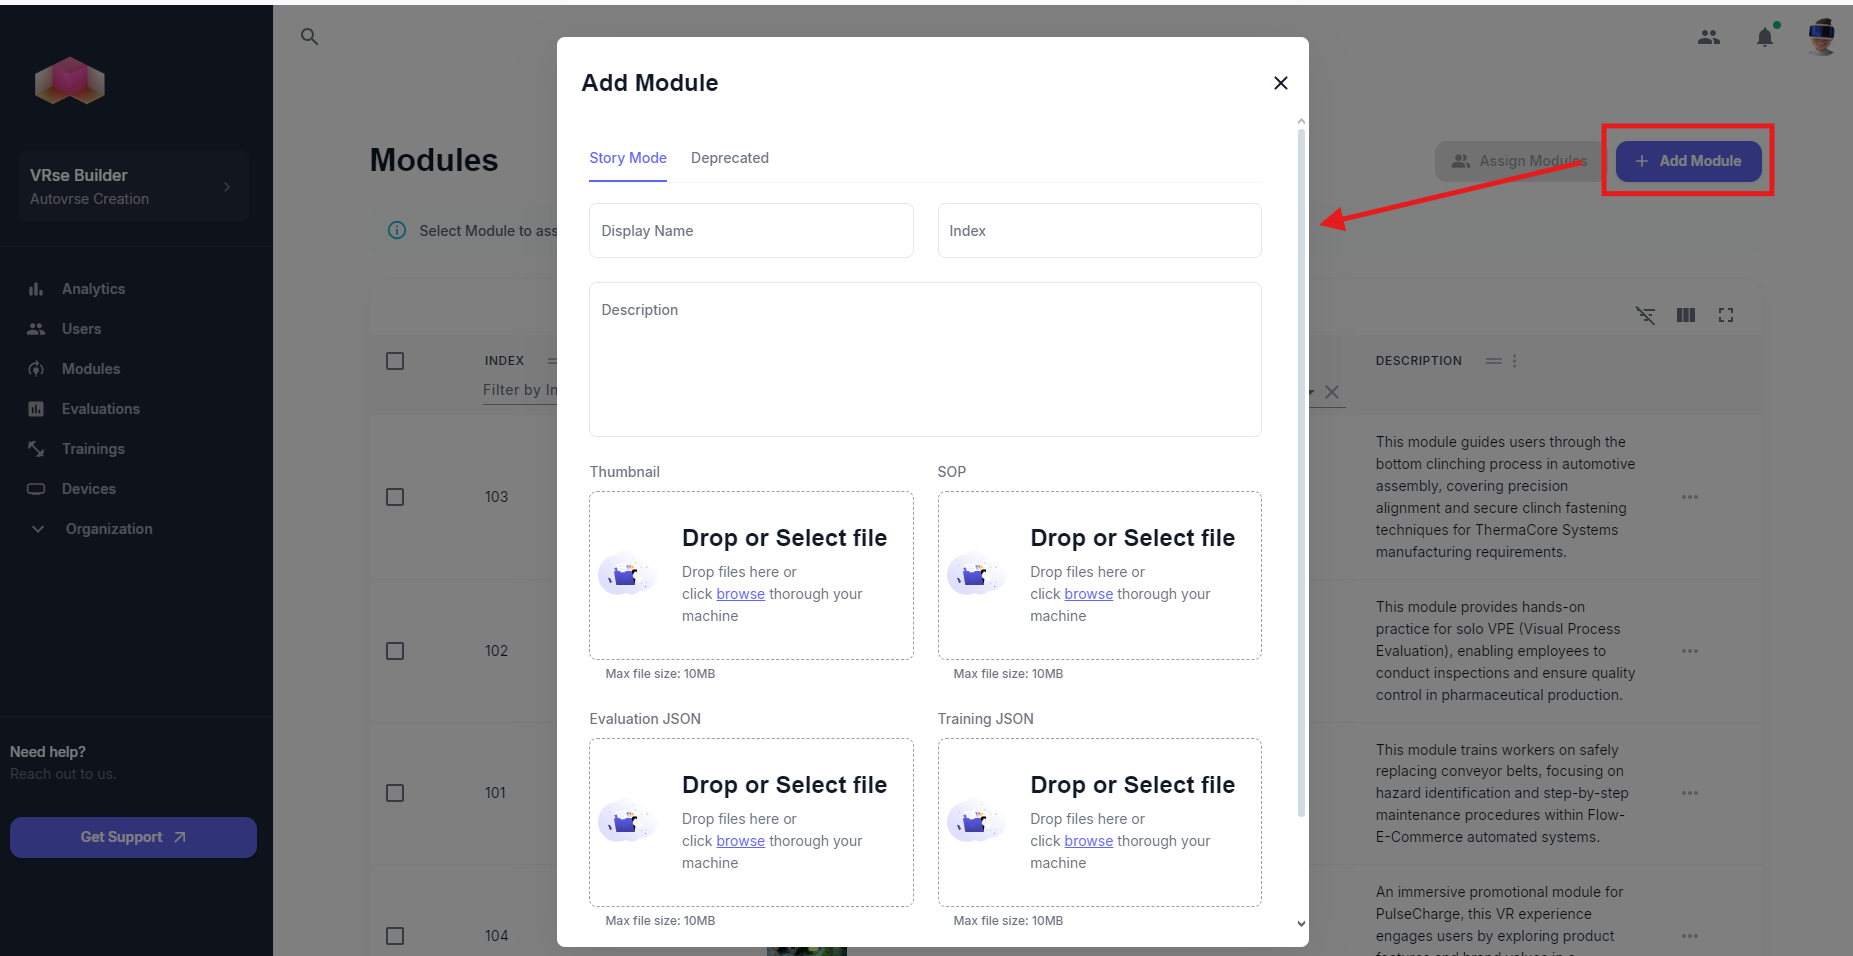
 The module creation process
In the modules section, click on "Add Module"
Give your module a name and description, upload thumbnails
The module creation process
In the modules section, click on "Add Module"
Give your module a name and description, upload thumbnails
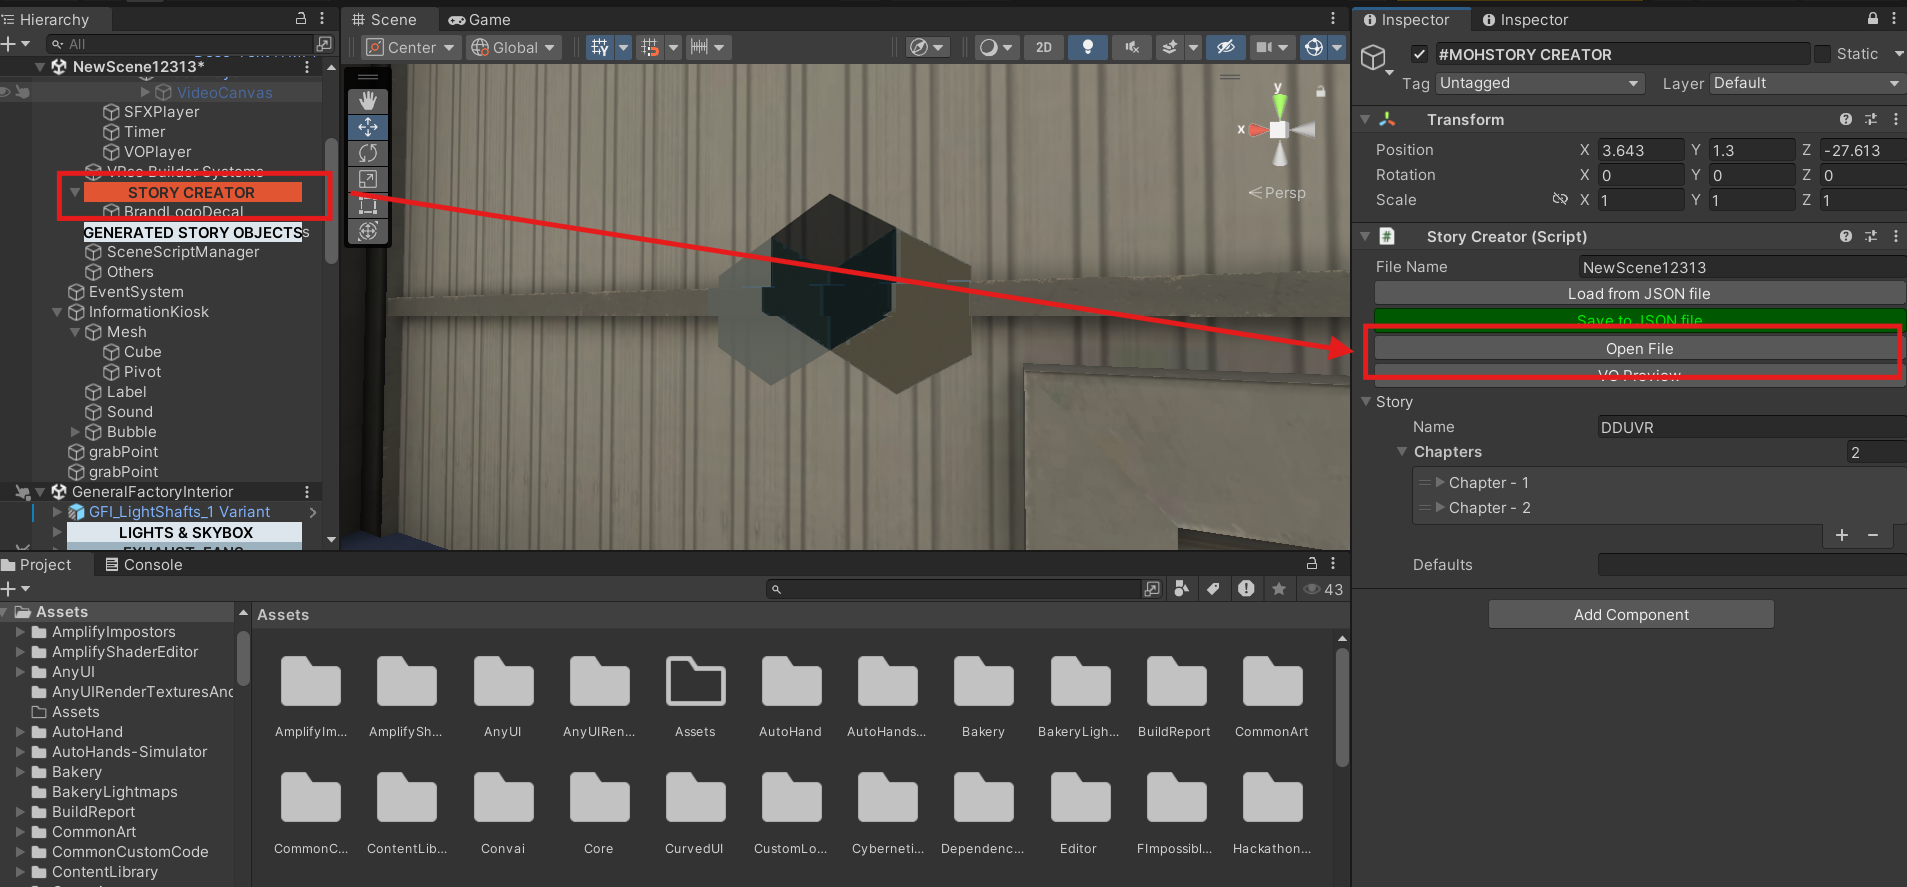
 Get your JSON from Unity, for doing this go to the Debug Helper on the scene and select "Open File" or just search it in your project window, the name will be mentioned on the Debug Helper
 This file needs to be uploaded on Pulse when you are creating a module, this can be updated later as well if you make any changes to the module
After creating it, make a note of the name and index
After the module is created, select it on the table, this unlocks the "Assign Module" button and select the user your created earlier
Find your [RoomManagerConfig](https://autovrse-749835a2.mintlify.app/unity-sdk/project-config-files) and open up the Experiences tab, create a new module in that, give it the same name and index from the dashboard.
This file needs to be uploaded on Pulse when you are creating a module, this can be updated later as well if you make any changes to the module
After creating it, make a note of the name and index
After the module is created, select it on the table, this unlocks the "Assign Module" button and select the user your created earlier
Find your [RoomManagerConfig](https://autovrse-749835a2.mintlify.app/unity-sdk/project-config-files) and open up the Experiences tab, create a new module in that, give it the same name and index from the dashboard.
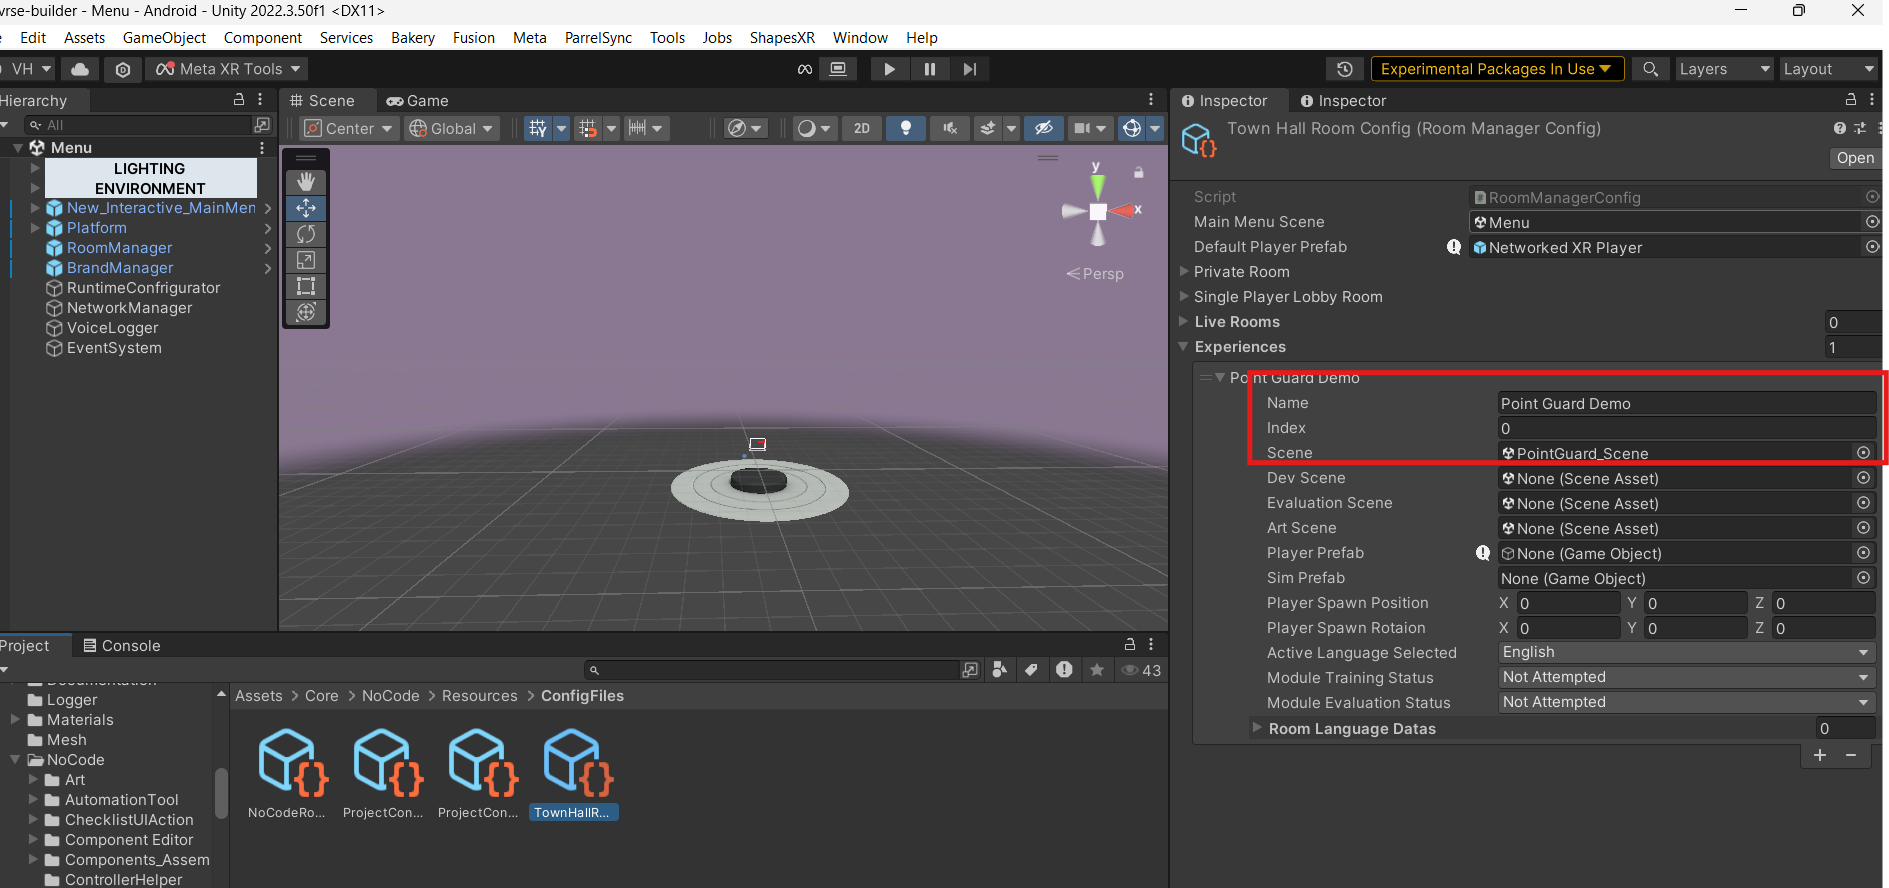 Change other options as you like, and now your module connected to the backend! Once you hit play and login from the menu scene and play the module, data will start getting recorded
## TTS
Text-To-Speech feature is present on the Unity Editor to generate voice overs for your experience, however you need to add API keys for the same in a configuration
In Unity, go to **Edit>Project Settings>VRseBuilder>Language**
The configuration here is setup such that an API from [OpenAI TTS](https://platform.openai.com/docs/guides/text-to-speech) or [VoiceMaker](https://voicemaker.in)
Add your key in the API Key section
Change other options as you like, and now your module connected to the backend! Once you hit play and login from the menu scene and play the module, data will start getting recorded
## TTS
Text-To-Speech feature is present on the Unity Editor to generate voice overs for your experience, however you need to add API keys for the same in a configuration
In Unity, go to **Edit>Project Settings>VRseBuilder>Language**
The configuration here is setup such that an API from [OpenAI TTS](https://platform.openai.com/docs/guides/text-to-speech) or [VoiceMaker](https://voicemaker.in)
Add your key in the API Key section
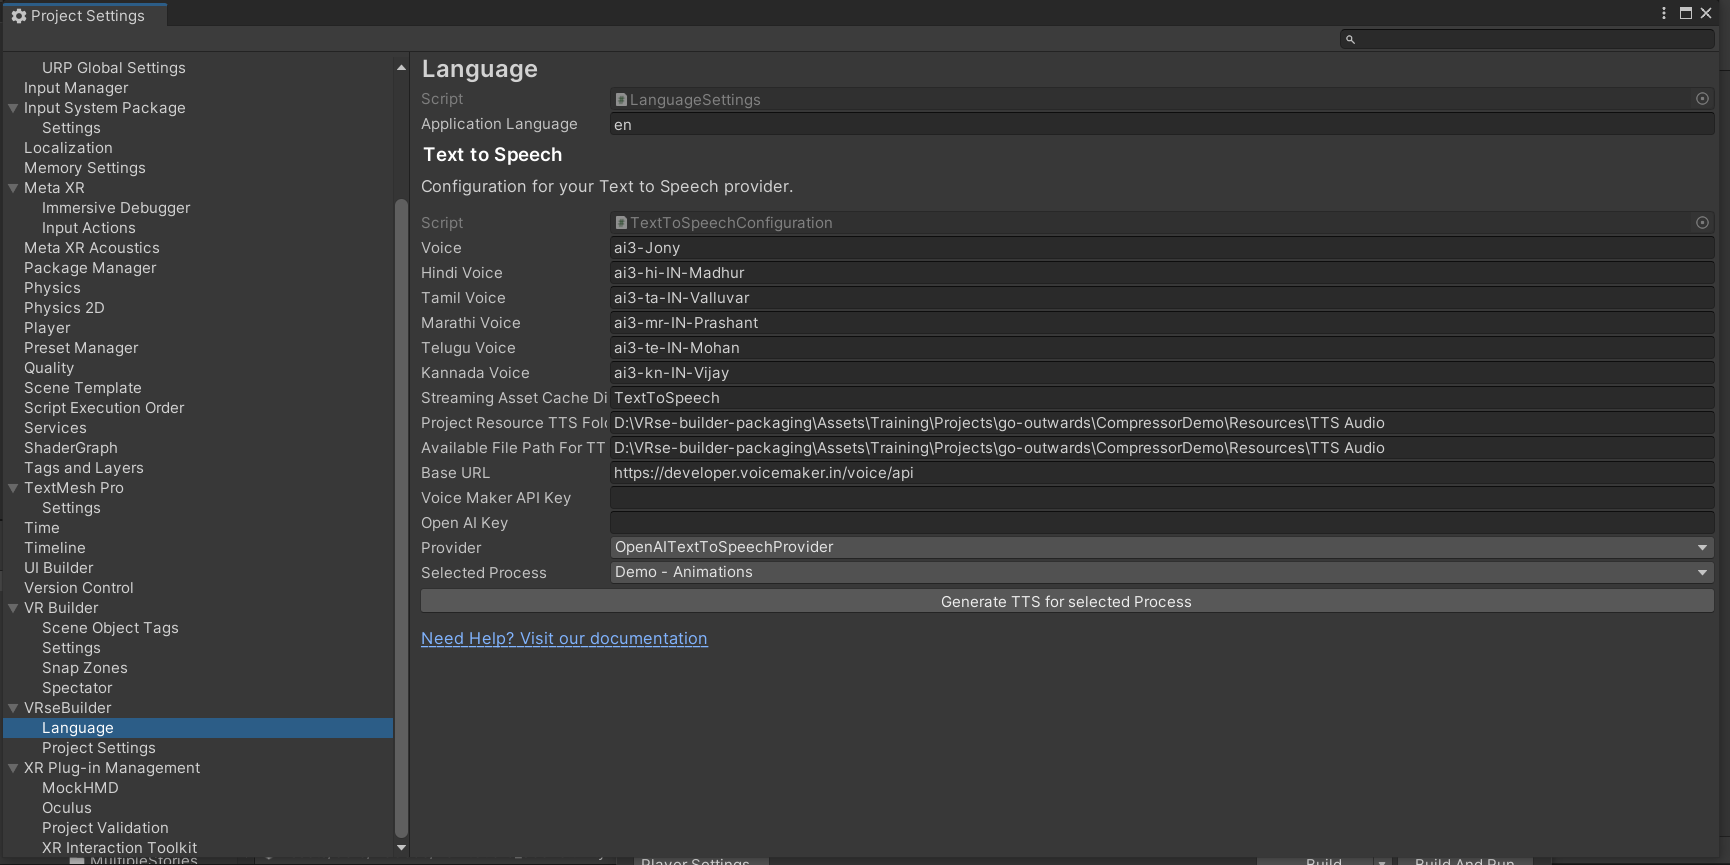 Once you have given your key save the project setting and move to the next step. If the Provider key is valid you should be able to now generate Voice Overs using your configured key account.
### Using VoiceMaker
Voicemaker can be used as a provider for generating Voice Overs (VO) in addition to other available options. It is particularly effective for regional languages, ensuring high-quality and natural-sounding audio output.
#### Steps to Use Voicemaker:
1. **Change the Provider**:Navigate to the **TextToSpeechConfiguration** page and select **VRBAPITextToSpeechProvider** from the **Provider** dropdown menu.
Once you have given your key save the project setting and move to the next step. If the Provider key is valid you should be able to now generate Voice Overs using your configured key account.
### Using VoiceMaker
Voicemaker can be used as a provider for generating Voice Overs (VO) in addition to other available options. It is particularly effective for regional languages, ensuring high-quality and natural-sounding audio output.
#### Steps to Use Voicemaker:
1. **Change the Provider**:Navigate to the **TextToSpeechConfiguration** page and select **VRBAPITextToSpeechProvider** from the **Provider** dropdown menu.
 2. **Enter API Key**:Under the same settings, enter your **Voicemaker API Key** to authenticate and enable the service.
3. **Generate Voice Overs**:Once the provider is set to Voicemaker and the API key is entered, you can proceed to generate Voice Overs. All subsequent VO generations will now use Voicemaker as the provider.
For more details about Voicemaker, visit their official website: [Voicemaker](https://developer.voicemaker.in/apidocs).
2. **Enter API Key**:Under the same settings, enter your **Voicemaker API Key** to authenticate and enable the service.
3. **Generate Voice Overs**:Once the provider is set to Voicemaker and the API key is entered, you can proceed to generate Voice Overs. All subsequent VO generations will now use Voicemaker as the provider.
For more details about Voicemaker, visit their official website: [Voicemaker](https://developer.voicemaker.in/apidocs).